- Co-Author: Omar Reda
The challenge
With the rise of containerization technologies and Kubernetes as one of the most used container management systems, Kubernetes–as a-Service (KaaS) feature is a must for each cloud provider.
The solution
We are thrilled to inform you that KaaS is now available for preview for our customers on the Whitesky.cloud platform. In order to provide easy deployment and management of clusters, we relied on integration with Rancher.
Why Rancher?
We opted for Rancher as the market leader in open-source, cloud-native Kubernetes management. With support for any certified Kubernetes distribution, Rancher enables seamless management and scaling of workloads across numerous clusters. The Rancher Kubernetes Engine (RKE) eliminates the difficulties associated with deploying and managing infrastructure by automating Kubernetes operations
Our integration lets you seamlessly deploy all the components of the Kubernetes management environment in the whitesky.cloud portal while you stay in control of the configuration and the physical locations of the workloads.
With API calls or through the Rancher dashboard, you can automate the installation and management of your containerized applications, easily expose them to the public and add persistent storage with just one click. These features are specific to the Rancher integration with the whitesky.cloud platform:
- Login to Rancher UI with Identity Access Manager (IAM).
- Support for geo-redundant clusters.
- Support for acquiring Let’s Encrypt certificates for domain names associated with your cluster and applications in automated way.
This blog will detail and demonstrate the process of deploying Kubernetes clusters and installing containerized applications in the whitesky.cloud portal. Our demonstration will involve deploying a Rancher management cluster, followed by the provisioning of a Kubernetes cluster, and finally, the deployment of a sample WordPress application.
How to Rancher in whitesky.cloud
Let’s begin by deploying a Rancher management cluster in whitesky.cloud.
Management clusters live under the Containerspaces section in the portal, next to Cloudspaces and Objectspaces. A Containerspace is a container management platform that provides our customers with the tools and services they need to deploy, manage and maintain their Kubernetes clusters, containerized applications and infrastructure.
Prerequisites to deploy a Rancher management cluster on the whitesky.cloud portal:
- Active customer. Containerspaces are created under a current customer and can be accessed only by the customer’s admins. Make sure your IAM user is an admin of your current customer.
- Cloudspace where Rancher workers will be provisioned. Check the Cloudspaces documentation.
- Optionally, a DNS record to securely access your Rancher UI dashboard. Check the DNS documentation.
- Optionally, an SSL certificate if you want to provide your own certificate for your Rancher.
Step 1
Navigate to Containerspaces page and click + CREATE MANAGEMENT CLUSTER in the sub top bar. A configuration form will show.
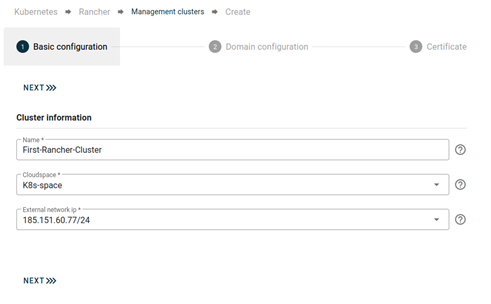
Step 2
Fill in the required configurations:
- Management cluster name. The name is needed to refer to the cluster within the portal.
- Cloudspace where RKE nodes should be provisioned.
- External network ip address that will be used to access the RKE dashboard. The dropdown menu lets you choose one of the public network interfaces of the selected cloudspace. This interface will be used to make the cluster publicly available.
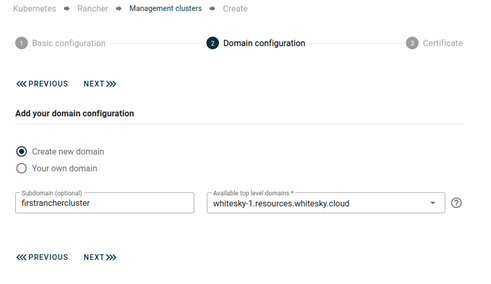
Step 3
Set up domain that will be used to access RKE cluster:
- Create a new domain. This option allows you to make use of the DNS functionality and automatically register a new subdomain of one of your customer’s top-level domains.
- Provide your own domain. Choose this option if you have created a domain name record that points to the public IP chosen in Step 2, in an external DNS hoster.
This domain will be linked to the IP address allocated for this containerspace on the cloudspace’s external network.
Step 4
Configure TLS.
To access your cluster securely over https you need to get an SSL certificate for your domain, this is required here. You have two options:
- Issue your own certificate for your domain and add it to the certificates of your customer on Admin->Certificates page.
- Use Let’s Encrypt flag to issue your certificate in an automated way. We invite you to try out this feature free of charge and it is a quick way to secure your cluster’s UI with an SSL certificate. The certificate will be seamlessly fetched on your behalf by the certificate manager of the management cluster.
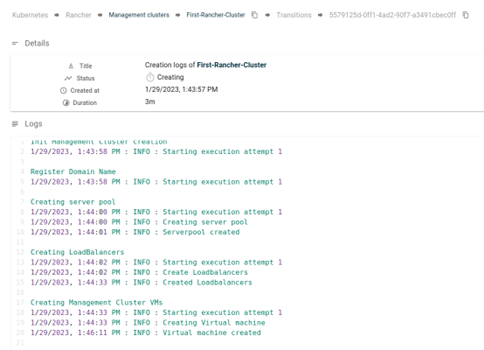
Now, when the configuration is completed, you can proceed with deploying your RKE cluster. This process will take a few minutes, as it includes creating serverpools, load-balancers, and deploying VMs with RKE and Rancher installed. Observe the progress on the logs and details page
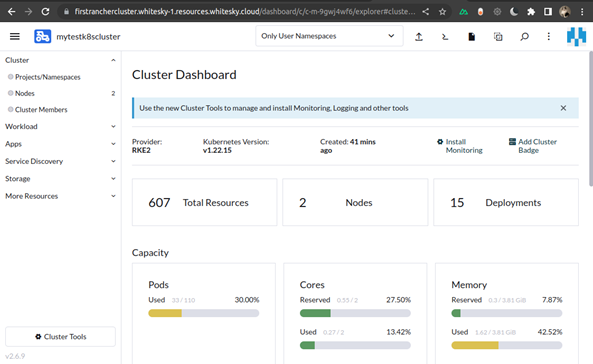
Once the provisioning is over a new Rancher management cluster will appear on the Containerspaces page. Now you can access the Rancher dashboard via the domain that you provided in Step 3 of the configuration process. Log in to the Rancher dashboard with your usual IAM user.
In case you wish to control and monitor your cluster via kubectl or via an IDE, you can get the kubeconfig on the cluster’s details page.
How to create a Kubernetes cluster with Rancher
A Rancher management cluster takes away the complexity of organizing and managing a group of Kubernetes clusters. In whitesky.cloud you have two options for creating Kubernetes clusters:
Option 1 (Limited). Use the Rancher dashboard to create your clusters. However, this is not very convenient, as you will not have support for automated load balancer services due to the lack of the cluster manager, which is installed automatically in option 2, and which cannot be installed after cluster creation.
Option 2 (Recommended). Use the whitesky.cloud UI and/or APIs to create your clusters. This way, you can fully take advantage of our Rancher integration, for instance, you can create clusters in any cloudspace and location available to your customer. We will illustrate this by creating a geo-redundant Kubernetes cluster using the whitesky.cloud portal.
It is important to note that any cloudspace that is not the one in which Rancher is operating must be connected to the Rancher cloudspace. Additionally, the various cloudspaces hosting the node pools for the Kubernetes cluster must also be connected to each other.
To start, navigate to your Rancher management cluster details page and click +CREATE KUBERNETES CLUSTER in the sub top bar. A configuration wizard will appear:
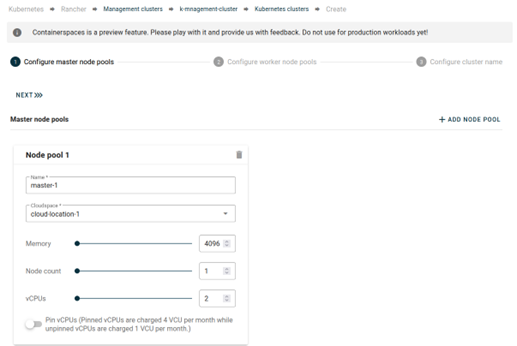
Step 1
Configure master node pools. Click +ADD NODE POOL to scale up the setup. Each master node pool can be linked to any cloudspace in the location of your choice. Note that the number of node pools should be uneven.
Step 2
In the next step of the wizard, configure the worker node pools in the same way you configured the master node pools.
Step 3
Choose a name for your cluster and proceed with the cluster provisioning.
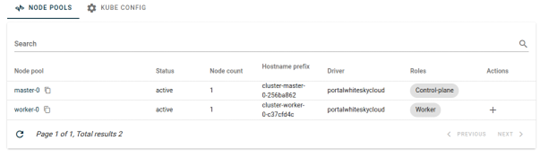
You can monitor the provisioning of the configured master and worker nodes in the Rancher dashboard.
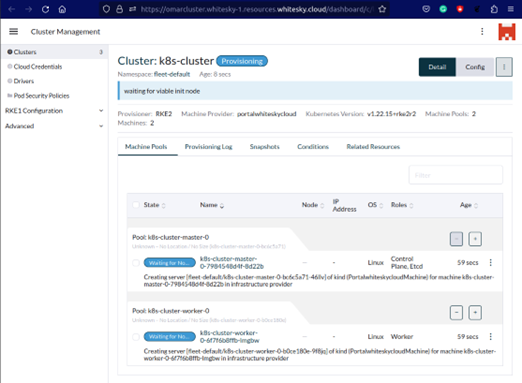
Meanwhile, on the cluster details page, you can see the VMs being deployed for the master and worker node pools in the selected cloudspaces. The kubeconfig can be accessed on the KUBE CONFIG tab of the cluster’s details page in the whitesky.cloud portal.
The following components will be automatically installed by the whitesky.cloud portal upon completion of the Kubernetes cluster deployment:
- The whitesky.cloud CSI driver for automating PV provisioning
- Cert manager for automating TLS certificate handling
- Nginx Ingress controllers for each worker node pool
Once the cluster is deployed, you can manage it from the Rancher dashboard or from your locally installed client.
How to deploy applications
With the new cluster successfully provisioned, it’s now time to install a sample containerized application, such as a WordPress server, on top of it.
Prerequisites: In preparation of deploying a sample WordPress application, it is necessary to secure a domain name for the application to be accessible from. Note that the domain name needs to be registered with the IP address of the load-balancer that is deployed in front of your worker nodes. This information can be found on the Ingress tab in the Cloudspace’s details page.
To expose the Kubernetes cluster, choose the appropriate Cloudspace. The IP address of the load-balancer can be located on the load-balancer details page under Cloudspace > Ingress > Load-Balancers.
You can immediately associate your domain name by utilizing the DNS feature and establishing a DNS record on one of the cloudspaces connected to your cluster. On the cloudspace’s details page in the DNS tab click +ADD DNS RECORD in the sub top bar and follow the instructions. See documentation for more details [dns docs].
Ensure that your domain name is linked to the same IP address that is set up in the load balancer for your cluster’s worker nodes in the selected cloudspace when registering your domain. With the domain for your future WordPress site prepared, you can now proceed to deploy the application:
Step 1
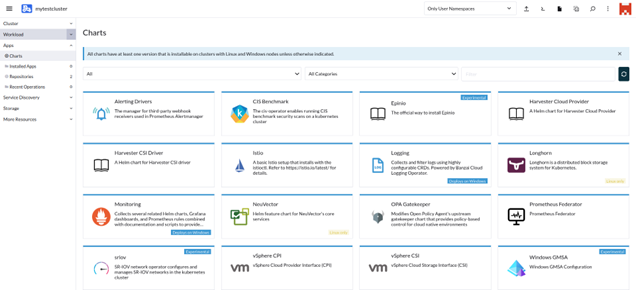
In the Rancher UI select your cluster and go to the list of helm charts under Apps->Charts. Choose WordPress and click Install. Proceed with the installation wizard.
Step 2
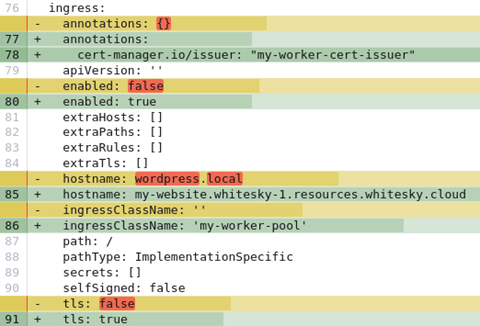
When you reach the Helm configuration step, make the following adjustments to the WordPress yaml file to expose your application publicly via Ingress:
- For annotations enter the name of a cert-manager of your cluster. You can find the cert-manager in the Rancher UI under More Resources > Cert Manager.
- For isgress.enabled set
- For isgress.tls set
- For hostname enter the domain name of the application.
- For ingress.ingressClassName enter the Ingress class name. You can find it under More Resources > Networking >
- For IngressClasses.type enter service type ClusterIP to configure Ingress.
Step 3
Confirm your configuration and proceed with the WordPress installation.
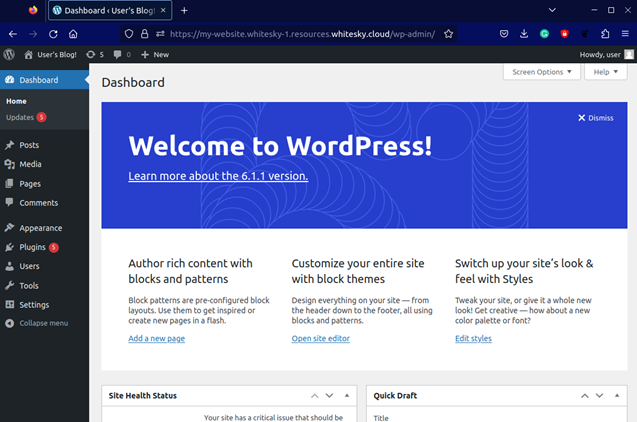
As the result of this exercise, you will be able to access the WordPress application through your browser using the domain name you set up previously.

Conclusion
This how to blog introduces our newly integrated KaaS feature powered by Rancher. By means of a small practical example we showed you how effortless it is, in a few clicks, to deploy a publicly accessible WordPress application secured with a Let’s encrypt certificate on a Kubernetes cluster.
Although our Rancher integration provides our customers with a fully automated method to manage their Kubernetes clusters on the whitesky.cloud platform, for us this is only the beginning. We have other exciting integrations on our roadmap.
You can find more information in our documentation and tutorials.